
Effortless Eye Movement: Continued
- Steph

- Nov 23, 2020
- 11 min read
Updated: Jul 7, 2021
PART TWO: SMOOTH MOVEMENT & RANDOM LOOKING
Using Unity Version 2019.4
If you've been following along with the first part of this tutorial series, you should have a basic eye movement and targeting system in place. If not, check it out and meet us back here!

Let's recap what we should have in place:
Our character is set up with an eye movement monobehaviour, which uses either eye bone transforms or UV texture offsets.
Your character has an eye rig parented to the head transform.
Our character has an animator controller that contains a Default state, with no behaviour, and a LookAtTarget state which uses a LookBehaviour script.
The Problem
There are two things we want to do to our eye movement system at this point: 1) Smooth out the transitions to and from a look state, and 2) Extend our system to allow our character to randomly look around.
The approach will differ greatly depending on the method you've chosen, but both will make use of coroutines.
About Coroutines
The Unity Manual does a pretty good job of explaining coroutines:
"[A coroutine] can be used as a way to spread an effect over a period of time...it is also a useful optimization. Many tasks in a game need to be carried out periodically and the most obvious way to do this is to include them in the Update function. However, this function will typically be called many times per second. When a task doesn’t need to be repeated quite so frequently, you can put it in a coroutine to get an update regularly but not every single frame."
Think of a coroutine like a "to do" list. Rather than execute all of your commands in a single frame update like a normal function, a coroutine allows you to go through your list of commands over time, repeat them on a loop until a condition is met, or even wait before executing a subsequent command.
So with that in mind, let's get to the tutorial part of this tutorial.
The Solution
Since this tutorial promises to cover two different ways to tackle eye movement, we'll need to split the tutorial into two parts. Choose the part that's right for you depending on the eye movement system you went with.
Eye bone transforms
The first things we’ll fix up are our transitions to and from looking. You may have noticed that, although the character follows the target fluidly when they’re in the “LookAtTarget” state, they don’t transition smoothly into and out of it. There are a number of ways to do this, but we’ll use the float parameters within animator.SetLookWeight.
There are three things we need to do to make this happen:
1. Add new parameters We need to create new parameters for every float we’re using in the LookAt interface. I’m only using the head weight and eye weight, so I’ll need two. If you’re using the body weight, you’ll want to add a third. Add these float parameters to your animator.

2. Update the animator with clips: We need to create three new animation clips. These clips will only contain the new float parameters just created. I’ve called these three clips “StartLooking”, “StopLooking”, and “Looking”. Drag your “StartLooking” and “StopLooking” clips to the animator controller as new states. Make note of the values you chose in the animator behaviour. That will be your “max” weight. Open the clips and add the new floats from the animator. Then switch from Dopesheet to Curves and edit the two existing keys. In “StartLooking”, my first key will have a value of 0 for both floats. My end key will have a value of 0.35 (for my max eye weight) and 0.15 (for my max head weight). Repeat this for your “StopLooking” clip with the reversed value (max weight to 0) for both floats. You can add or manipulate the keyframes as you see fit to speed up, slow down or ease the transitions and make it look as natural as possible.

The “Looking” clip will be added to any of the states that uses the behaviour. For now, that’s just our “LookAtTarget” state. Click on that state and drag the “Looking” clip to the Motion field. In this new clip, add the floats and just set both keyframes to your max value. Delete your existing transitions. At this point, you are going to ALWAYS transition to your “StartLooking” with the transition condition and then automatically, with no condition, to “LookAtTarget”. Likewise, you will always transition to your “StopLooking” state, with the DefaultEye condition, before automatically transitioning to the DefaultEye state with no condition. Here’s how mine looks:

3. Update your LookBehaviour code Now that your animator is set up, it’s time to go back into our LookBehaviour code. In the OnStateIK call, add new lines for the float parameters you've just added:
NOTE: If you’ve called your parameters something different, just make sure you replace my float names with your own. You could expose the float names as public string parameters if you wish.
Save the code and go back to your scene. Now when you enter playmode you’ll see a smooth transition into and out of targeting.

This is usable as it is now, but I promised one more behaviour: Randomly looking around.
Again, there are a few ways you could do this. You could, for instance, find the current rotation/position of the character and generate a random point to look at, based on that transform. But we’re going to take an easier route and extend our eye rig.
First, add a child to the eye rig that will contain a number of look targets. You can have any number of look target children, but I’ve gone with six. Name them something like “LookTargetx” where x is a consecutive number. Then duplicate the DefaultLookTarget and drag it under the EyeRig parent. Call this child MovingTarget. We'll use these targets in our EyeMovement script, so let's open it up and start writing our coroutine.
I want my coroutine to do a few things:
I want to switch my characters active looking target to the MovingTarget child.
I want it to pick a random target from the six look target children I just created.
I want to move the MovingTarget child to that position so my characters eyes follow it.
I want to look at that target for a random amount of time.
I want this to repeat for as long as my character is randomly looking around but stop as soon as I leave the state.
When I leave the state, I want my MovingTarget child to move back to the default position
You might be wondering why I’m moving a target around instead of just looking at the new targets. I could do it that way, but just like in our target looking state, the character’s head and eyes would snap into position. I want it to move fluidly, so I’ll have it look at a moving target so it will follow that target around.
This is how we’ll do it: First, we’ll check to see if the character is in the randomly looking state. This bool will be turned on when we enter the state and turned off when we exit. (We’ll add this to our behaviour script in a moment.) If we are in that state, we’ll set up a counter and duration to effectively control how long we want the eye movements to take. I want my character’s eye movement speed to be random, so I’m going to set my movement duration to a random range between 0.15f and 0.5f.
Next, we’ll pick a random target from the look children we created and make sure it’s not the target we’re already looking at. Then we’ll find the current position of the Moving Target child and lerp it to the new target position. After that, we wait for a random number of seconds before we run through the process again!
So with all of that in mind, add the following parameters to your EyeMovement code:
public Coroutine lookRandomly: Coroutines can be complicated because you can start them in multiple ways. We’re setting up a parameter to cache the coroutine because that will also allow us to directly stop it.
public bool isRandomlyLooking: this bool will be used to check that we’re in our RandomLook state.
public float duration: The duration is a private float. It’s value will be determined in our code.
public Transform[ ] randomTargets: This is an array for you to add your Look Target children (do not include the Moving Target child in this array)
public Transform movingTarget: This is the Moving Target child.
public Vector3 nextTarget: The look target your character will be looking at next.
And here's the coroutine you'll need to add:
As far as I know, you can't call coroutines directly from a state machine behaviour, so I’m also going to add a function to start and stop the coroutine based on the isRandomlyLooking bool
Now we should add the RandomlyLooking state to our animator. Since we want to smoothly transition into and out of this state, we'll bracket it with our Start and Stop clips, just like we did for the LookAtTarget state. Set them up exactly the same way, but rename them to indicate the state they are starting and stopping. Remember to add the "Looking" clip, and the behaviour script to the RandomlyLooking state. Here's how my final animator looks:

Finally, add a new trigger parameter to transition into the RandomlyLooking state.
One of the things you might have noticed about my setup is that I always pass through the default state, rather than allowing the random or targeted eye states to be called from Any State. I’ve consciously done this. At first I had planned to expand the look behaviour to enable this, but I decided against it. The character will always need to pass between the default state before randomly looking or targeting an object to maintain the fluidity of the movements. I don’t want to snap directly into a random looking state, and likewise, I don’t want to snap directly to looking at a target. By requiring the character to pass through the default state, I ensure that the start and stop states are always passed through. You can amend this in your own code if you choose to do so.
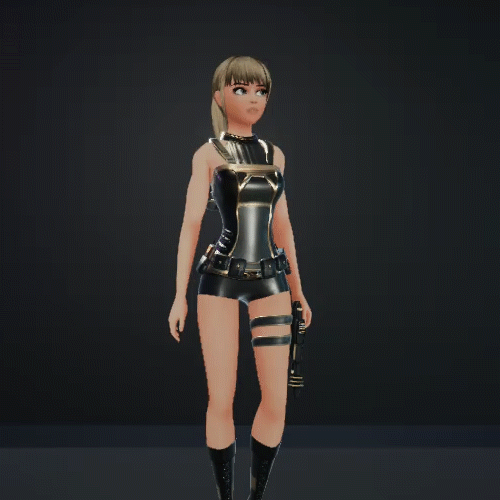
Go to play mode and try out your randomly looking state. It should look something like this:

Here is our final code for the Eye Movement system:
And our final code for the Look Behaviour:
Texture UV Offset
If you've chosen the UV offset system, you'll want to continue the tutorial here.
Let’s address the smooth movement for our UV offsets. With how it’s set up now, when we stop looking at a target, the offset zeros out automatically. That’s because, in the OnStateExit function of the look behaviour, we’ve simply zeroed out the look offset. What we want to do instead is change the offset value back to zero over time so we have a smooth transition.
Unlike with the bone transform method, we aren't going to do this by smoothing out the floats. Instead, we'll use a coroutine.
We’ll only need one new parameter for this coroutine, which is a private float. The float will handle the duration of time it takes to move the eyes back to their default position. This is the code for the coroutine:
The coroutine works by getting the current position of our active look target, along with the current rotation of the eye rig. Then, using a set duration, it will move to our default position and rotation. At the same time, it will lerp the offset values from their current value zero.
This is simple to do because we call it in the exit function of the state, so we don’t have to worry about the offsets in the update function. However, to look at the target smoothly is a bit more complex and, because it isn’t as noticeable as snapping back to the default position, we can safely ignore it.
We want to call this from our OnStateExit function in our behaviour, but as far as I know, we are unable to do so directly. As such, we'll add a function to start this coroutine, and to set our new target to the default look target.
For now, we are temporarily going to amend our OnStateExit function in the behavior script to correctly start the coroutine.
Save everything and run it to see how it looks. You should see the character smoothly looking back to the default position from the target state.
Let’s move on to the random looking.
For this to work, we’re going to expand our eye rig by creating a selection of look targets for the code to choose from. Under the Eye Rig, add a child called “Random Look Transforms”. Then create as many children under this as you want. I’ve gone with six. Call them “LookTransformx” where x is a consecutive number. Move them around your character until you’re happy with their positioning. To aid you, you can set them as a look target and move them to an ideal location in play mode. Just remember to copy the transform settings before you leave play mode so you can paste the data in edit mode.
Once you’ve moved all of your transforms, open up your Eye Movement monobehaviour. We need to add some new parameters:
public Coroutine lookRandomly: Coroutines can be complicated because you can start them in multiple ways. We’re setting up a parameter to cache the coroutine because that will also allow us to directly stop it. We didn’t need to do this with our BackToDefault coroutine because once it’s done, it stops itself with the “yield break” statement. This coroutine, however, will repeat itself as long as our isRandomlyLooking bool is active, which means we want to be able to stop it.
private bool isMoving: this bool will determine if the transform is moving so we don't interrupt our position with the next movement.
public bool isRandomlyLooking: this bool will be used to check that we’re in our RandomLook state.
public Transform[ ] randomTargets: This is an array for you to add your Look Target children (do not include the Moving Target child in this array)
public Transform movingTarget: This is the Moving Target child.
public Vector3 nextTarget: The look target your character will be looking at next.
This coroutine will work much like BackToDefault with a few exceptions. First, the duration will be chosen randomly from a defined range. Then it will select a random "next" look target from our list of LookTargets. From there, it will capture the current position of our active look target, along with the current rotation of the eye rig. Then, using the random duration, it will move to the random next target position and rotation. (Since it's within the state, we don't need to worry about lerping the texture offsets as long as we're moving the look target.) After it has finished, it will wait for a random number of seconds before choosing a new target and repeating the process until we exit the state.
Here's the complete coroutine:
The last thing we need to add to the code is a function to start the coroutine. This function will take a bool parameter to see if “isRandomlyLooking” is true. If it is, it will call the coroutine, but if it’s false, it will stop the coroutine.
Now that our eye movement system is updated, we will go back to our animator and add a new state called “RandomLook”. Add the Look Behaviour to this state and make sure the exposed parameters match the LookAtTarget state. At this time, it’s also wise to add a trigger parameter and set the transitions for testing purposes.

We have one last piece of work to take care of before we can run the code properly. Open up the Look Behaviour.
In the OnStateEnter function, we’re going to add an if statement to check if our character is in the RandomLook state. If it is, we’ll make sure the look target is the default target, not the active target. Then we’ll set the isRandomlyLooking bool to true and call our new function.
In our OnStateExit function, we’ll delete our function call and move it to an if statement. The if statement will check if we are currently exiting the RandomLook state OR the LookAtTarget state. Then it will check if isRandomlyLooking is true. If it is, it will stop the coroutine. Lastly, it will call the function to reset the look position to default.
Go to play mode and try out your randomly looking state. It should look something like this:
Here is our final code for the UV Eye Movement system:
And the UV Look Behaviour:
Wrapping Up
You now have a working eye movement system! You can set up the transition conditions in your animator to sync with specific animations. For example, trigger your RandomLooking state when you enter your character's Idle animation, or trigger your LookAtTarget state when you enter a combat stance! The behaviour will work automatically to ensure that the eyes move correctly according to the state you've chosen.
Quick Resources
Used in this article:


Comments